Troubleshooting Security Camera Not Connecting to Wi-Fi
Most security camera Wi-Fi failures come down to the 2.4GHz band, weak signal, or router settings. This guide walks through each fix in order, from quick pre-checks to advanced router adjustments.
Dealing with a security camera not connecting to wifi can feel frustrating, but most connection failures trace back to a handful of common causes. This guide walks through the most frequent culprits, the exact fixes to try, and the steps to keep your camera online for good.
Why Your Security Camera Won’t Connect to Wi-Fi: The Short Answer
Most Wi-Fi connection failures come down to one of five problems: the camera is on the wrong network band, the signal is too weak, router settings are blocking the device, the camera isn’t in pairing mode, or the power supply is unstable. The good news is that most of these have a straightforward fix you can handle in minutes.
The single most common issue is the 2.4GHz versus 5GHz band conflict. Many cameras only support 2.4GHz networks. If your phone connects to the 5GHz band during setup, the camera can’t complete the pairing process.
Before you assume the camera is broken, work through the steps below. Most connection problems are network-level issues, not hardware failures.
Quick Pre-Checks: Rule Out the Obvious Before Diving In

Start with these five quick checks before you reset anything. They take less than two minutes and can save you a lot of time.
- Confirm the camera has power. Check the LED indicator. A solid or blinking light usually means the camera is on.
- Verify your home Wi-Fi is working. Connect your phone to the network and load a webpage.
- Check the camera app. Make sure it’s updated to the latest version.
- Move your phone close to the camera. Keep it within a few feet during setup.
- Confirm the camera is in pairing mode. Check the manual for the exact button press or QR code scan.
If all of these pass, move on to the band issue below. It’s the most likely culprit.
The 2.4GHz vs. 5GHz Problem: The #1 Reason Cameras Fail to Pair
Most security cameras only support 2.4GHz Wi-Fi. That band travels farther and penetrates walls better. The 5GHz band is faster but has a shorter range. Many modern routers broadcast both bands under one network name, called a single SSID.
Here’s the problem: your phone may connect to the 5GHz band while the camera only sees the 2.4GHz band. The two devices end up on different networks, and the camera can’t pair.
To fix this, you have three options:
- Split the bands so each has its own name, then connect the camera to the 2.4GHz network.
- Temporarily disable the 5GHz band in your router settings while you set up the camera.
- Create a 2.4GHz-only guest network and use that for the camera.
Once the camera is connected, you can re-enable the 5GHz band if you turned it off.
Step-by-Step: Reconnecting Your Security Camera to Wi-Fi
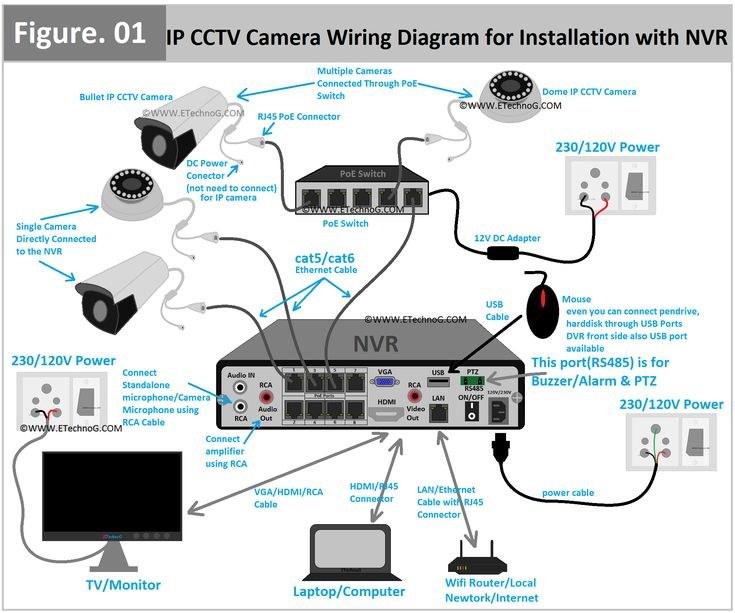
If the band fix didn’t work, work through this sequence in order. It covers the most common failure points.
Restart Your Router and Camera in the Correct Order
Restarting clears temporary network glitches. The order matters.
- Unplug your router and modem. Wait 60 seconds.
- Plug the modem back in. Wait for it to fully start.
- Plug the router back in. Wait for the internet light to go solid.
- Unplug the camera. Wait 30 seconds, then plug it back in.
- Try connecting the camera through the app again.
This sequence gives the network time to stabilize before the camera tries to join.
Reset the Camera and Re-Enter Pairing Mode
If a restart doesn’t help, a full reset often does. Look for the reset button or pinhole on the camera. Check the manual for the exact procedure.
Most cameras require you to hold the reset button for 10 to 30 seconds until you hear a chime or see a blinking LED. This clears the saved Wi-Fi settings and puts the camera back into pairing mode.
After resetting, go through the app setup again. Make sure your phone is on the same 2.4GHz network you want the camera to join.
Adjust Router Settings That Block Camera Connections
Some router features can block cameras. Check these settings in your router’s admin panel:
- AP isolation or client isolation. This prevents devices from talking to each other. Turn it off.
- MAC address filtering. If this is on, add the camera’s MAC address to the allow list.
- Firewall or security settings. Some aggressive filters block camera traffic. Try a temporary disable to test.
- UPnP. Some cameras need this enabled for remote access.
Make one change at a time and test the camera after each one.
Hub-Based Cameras: Check the Hub, Not Just the Camera
Some camera systems use a hub or base station. The cameras connect to the hub, and the hub connects to your router. If the camera won’t connect, the problem may be the hub, not the camera.
Restart the hub first. Check that it has a solid internet connection. Then try re-pairing the camera to the hub. If the hub is too far from the router, move it closer or use an Ethernet cable if the hub supports it.
Signal Strength and Placement: Why Location Determines Connection Success
Even when your network is fine, the camera’s location can prevent a stable connection. Signal strength drops with distance, walls, and interference.
Distance, Walls, and Common Interference Sources
Wi-Fi signals weaken as they pass through walls, floors, and large appliances. Concrete, brick, and metal are especially effective at blocking signals. Common interference sources include:
- Microwave ovens
- Cordless phones
- Baby monitors
- Neighboring Wi-Fi networks on the same channel
If your camera is on an exterior wall or in a garage, the signal may be too weak. Try moving the camera closer to the router during setup, then test the final placement.
Wi-Fi Extenders, Mesh Systems, and Powerline Adapters
If the camera is far from the router, you may need a signal booster. Wi-Fi extenders repeat the signal but can add latency. Mesh systems provide more consistent coverage across larger homes. Powerline adapters use your home’s electrical wiring to carry the network signal.
Each option has trade-offs. Extenders are cheap but can be unreliable. Mesh systems cost more but work better. Powerline adapters work well in homes with good wiring but may struggle in older buildings.
If your camera is in a detached garage or shed, a point-to-point wireless bridge may be the right solution.
Renter-Friendly Placement Options That Don’t Require Drilling
Renters often can’t drill into walls or alter the property. You have several options that avoid permanent changes:
- Use command strips or adhesive mounts rated for the camera’s weight.
- Place the camera on a shelf, bookshelf, or countertop.
- Use a freestanding camera stand or tripod.
- Mount the camera on a curtain rod or door frame with a clip.
Check your lease before installing anything. Some landlords require written approval for even temporary mounts.
Power and Hardware Issues That Mimic Wi-Fi Failures
Sometimes the camera appears to have a Wi-Fi problem, but the real issue is power. A weak battery or an underpowered adapter can cause the camera to drop offline or fail to connect.
Check the following:
- Battery level. If the battery is below 20 percent, charge it fully before setup.
- Power adapter. Use the adapter that came with the camera. Third-party adapters may not deliver enough power.
- Cable condition. Look for frayed or damaged cables.
- Outlet. Test the outlet with another device to confirm it works.
For wired cameras, verify the voltage matches the camera’s requirement. If you’re unsure about electrical work, consult a qualified installer.
Secure Your Camera After Reconnecting: Privacy and Cybersecurity Steps
Once your camera is back online, take a few minutes to secure it. A connected camera is an entry point into your home network.
If you’re concerned about someone watching your camera, change the password immediately and check for unfamiliar devices on your account. For brand-specific guidance, see our Ring video doorbell Wi-Fi troubleshooting guide.
When to Contact Support or Replace the Camera
If you’ve worked through all the steps above and the camera still won’t connect, it may be time for professional help. Contact the manufacturer’s support team with your camera model, firmware version, and a description of the issue.
Common signs that a camera needs replacement include:
- The camera won’t power on at all.
- The LED never changes state during setup.
- The camera connects but drops offline repeatedly within minutes.
- The camera has visible physical damage or water ingress.
Check your warranty before buying a replacement. Many cameras come with a one-year limited warranty. If the camera is within the warranty period, you may get a free replacement.
If you’re considering a new camera, look for one that supports the features you need, including the correct Wi-Fi band and remote access options. Some setups work fine without a Wi-Fi connection if your home network is unreliable.
Long-Term Maintenance: Keeping Your Camera Online for Good
Once your camera is connected, a little regular maintenance prevents future issues. Set a reminder to check these items every few months:
- Update firmware when new versions are available.
- Check battery health and charge before it gets low.
- Clean the camera lens and housing.
- Verify the camera still connects after router changes.
- Review storage capacity and delete old recordings as needed.
- Test alerts and motion detection.
If you change your internet provider or router, you’ll need to reconnect the camera. Keep the manual and app handy for that process.
Also, consider what happens during an internet outage. A camera that relies entirely on cloud storage won’t record during an outage. Some models offer local storage or a backup connection. Learn more about how security cameras behave during outages and plan accordingly based on your needs.
A security camera that won’t connect to Wi-Fi is almost always fixable. Start with the 2.4GHz band check, then work through restarts, resets, and router settings. If the camera still fails, check power and placement before contacting support. Once it’s online, secure the account and keep the firmware updated.
Frequently Asked Questions
Most connection failures come down to the 2.4GHz versus 5GHz band conflict, a weak signal, router settings that block the device, or the camera not being in pairing mode. Work through the restart, reset, and router adjustment steps in order to isolate the cause.
Yes, most security cameras only support 2.4GHz Wi-Fi. That band travels farther and penetrates walls better than 5GHz. If your router broadcasts both bands under one name, your phone may connect to 5GHz while the camera can’t see the network.
Look for the reset button or pinhole on the camera. Hold it for 10 to 30 seconds until you hear a chime or see a blinking LED. This clears saved Wi-Fi settings and puts the camera back into pairing mode. Then run through the app setup again.
Repeated offline events usually point to a weak signal, an unstable power supply, or router settings that drop the connection. Check the camera’s distance from the router, confirm the power adapter is the one that came with the camera, and review router features like AP isolation.
Yes, a Wi-Fi extender can help if the camera is far from the router. Extenders repeat the signal but can add latency. Mesh systems and powerline adapters are more reliable options for larger homes or detached structures.
Use a unique password and enable two-factor authentication. Update the camera firmware and app. Review shared users and app permissions. Set privacy zones to avoid recording neighbors or public areas, and check how long recordings are stored.