Connect the doorbell in the Ring app, join the temporary setup network, and choose your home Wi‑Fi. If pairing fails, check power, signal strength, and the correct Wi‑Fi band first.
Ring video doorbell connect to wifi is usually a quick app setup. The exact steps depend on the model and your home network. In most cases, you charge or power the doorbell, put it in setup mode, and use the Ring app to join the temporary setup network before choosing your home Wi‑Fi.
How to Ring Video Doorbell Connect to Wi‑Fi: The Fast Answer
The fastest path is to open the Ring app and add the doorbell. Then follow the in-app prompts. You will usually scan a QR code or enter setup mode, connect to the temporary Ring network, then choose your home Wi‑Fi and enter the password.
If the device does not appear, check power first. Then check the router band and signal strength. If you are setting up a battery model, a full charge helps avoid failed pairing, and our Ring battery doorbell setup guide covers the general prep steps in more detail.
What You Need Before Setup: Account, App, Power, and Network
Items needed before connecting a video doorbell to Wi-Fi.
Before you start, make sure you have a Ring account and the Ring app on your phone. Also confirm the doorbell is powered on and you can access your router settings. A few minutes of prep can prevent repeated setup failures.
Check the model, charging status, and doorbell power source
Ring doorbells can be battery powered or wired. The setup path can differ by model. Battery models often need a charge before pairing. Wired models need stable low-voltage power from the existing doorbell circuit.
If your device uses a removable battery, charge it first. If it is wired, confirm the old doorbell circuit is active and compatible before you begin. For battery maintenance later, see our how to charge a Ring battery doorbell guide.
Confirm your home Wi‑Fi details and router access
Have your Wi‑Fi name, password, and router login ready. If your network name changed recently, or if the password was updated, the doorbell may need to be reconnected from scratch.
It also helps to know whether your router uses 2.4 GHz, 5 GHz, or both. Many smart doorbells rely on 2.4 GHz during setup or for better range, depending on the exact model.
Step-by-Step: Connect a Ring Video Doorbell to Wi‑Fi
The process is usually the same. Power the doorbell, place it in setup mode, connect your phone to the temporary device network, then select your home Wi‑Fi in the app. Follow the prompts in order. Do not skip the app screens.
Put the doorbell in setup mode
Most Ring doorbells enter setup mode with a button press or a reset-style action described in the manual. When setup mode starts, the light pattern usually changes. That tells you the device is ready to pair.
If the doorbell is already installed, make sure it has power and is not stuck on a previous network. A failed reset is one of the most common reasons setup does not begin.
Use the Ring app to join the temporary setup network
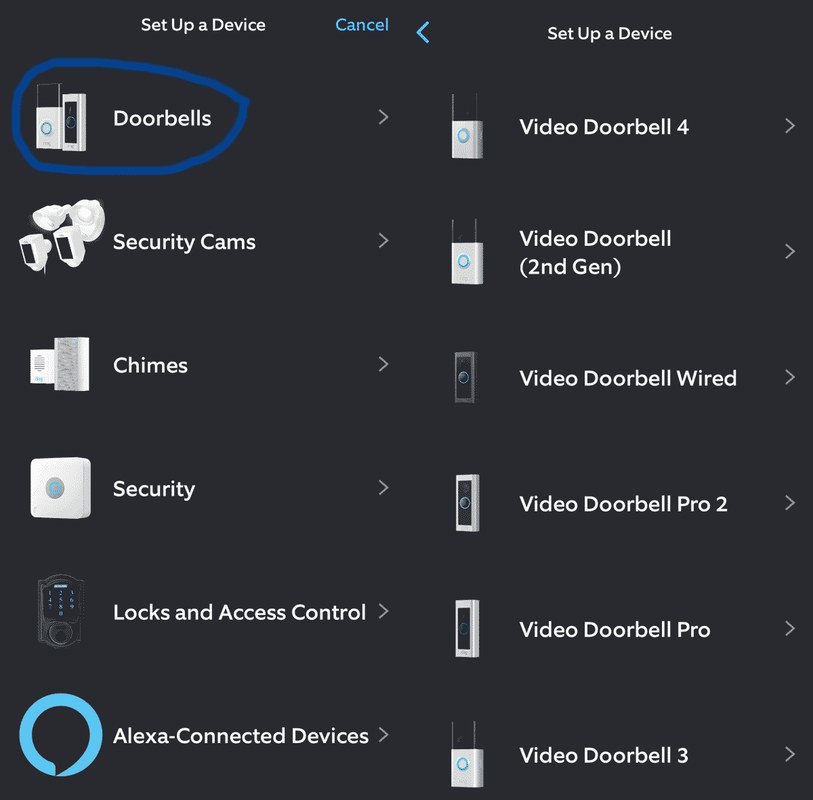
Open the Ring app, tap to add a device, and follow the prompts. Your phone may briefly connect to a temporary Ring Wi‑Fi network so the app can talk directly to the doorbell.
Stay close to the doorbell during this step. Walls, distance, and other wireless devices can interrupt pairing before your home network is chosen.
Select your home Wi‑Fi and finish pairing
Once the app finds the doorbell, pick your home network from the list and enter the password carefully. A typo, extra space, or old password can stop the setup.
After pairing, wait for the app to confirm the connection. Then test live view, motion alerts, and doorbell press notifications before you finish.
1
Confirm requirements
Verify the exact model, power, network, storage, placement, household, rental, and platform requirements.
2
Plan safe placement
Consider privacy, field of view, weather, height, doors and windows, wiring, and emergency access.
3
Install and secure
Follow the exact manual, update firmware, use a unique password, and enable MFA.
4
Test and maintain
Test alerts, recording, outage behavior, batteries, users, permissions, and backup procedures.
Wi‑Fi Compatibility, Placement, and Signal Strength<
Smart home security devices need strong Wi‑Fi for reliable setup and performance.
Good Wi‑Fi matters as much as the app setup. A strong signal helps the doorbell stay online, send alerts quickly, and keep video loads smooth.
2.4 GHz vs. 5 GHz support and why it matters
2.4 GHz usually travels farther and passes through walls better. 5 GHz can be faster, but it often has less range and weaker wall penetration.
That is why many video doorbells do best on 2.4 GHz, especially if the router sits far from the front door. If your model supports both bands, the app or router may guide you to the best choice.
Router distance, walls, and common signal blockers
Exterior walls, brick, metal doors, mirrors, and nearby electronics can weaken signal. Even a strong home network can struggle at the front porch if the router is far inside the house.
If the app shows weak signal or the doorbell disconnects often, move the router, reduce obstructions, or test the front door area with your phone first. That simple check can reveal a placement problem before you remount anything.
When to use extenders, mesh Wi‑Fi, or a chime/hub
Wi‑Fi extenders and mesh systems can help when the doorbell is too far from the main router. A mesh node near the entry can be especially useful in larger homes.
Some setups also use a chime or hub for better in-home alerts or network support, depending on the model. If you are comparing power and placement choices, our Ring battery doorbell wired vs battery guide can help you think through the tradeoffs.
Troubleshooting Connection Problems
Most connection problems come from power, network settings, or app permissions. Start with safe checks, then move to router changes only if needed.
Doorbell won’t enter setup mode
Check the battery charge or wired power first. If the device has no stable power, it may never start the pairing process.
Then confirm you are using the correct button sequence for your exact model. If the manual says to hold a button for a certain time, follow that instruction exactly.
App cannot find the device or temporary network
If the app cannot find the doorbell, stay near the device and turn on Bluetooth and location permissions if the app asks for them. Some phones also need Wi‑Fi enabled during setup, even if mobile data is active.
Restarting the app and phone can help, but avoid random factory resets unless the manual recommends them. A missing temporary network often points to weak power or a setup-mode problem.
Weak signal, failed pairing, or frequent disconnects
Weak signal usually means the doorbell is too far from the router or is blocked by walls and siding. Failed pairing can also happen if the password is wrong or the router uses a band the doorbell does not like.
If the device connects but later drops offline, test it closer to the router if possible. If it works there, the issue is likely range, not the doorbell itself.
After-router-change issues, password updates, and SSID changes
If you changed your router, network name, or password, the doorbell may need to be re-added. Smart devices often do not move to a new network automatically.
When that happens, use the app to update Wi‑Fi settings or set the device up again. If you renamed the SSID, make sure the new network name is the one you choose during pairing.
Installation and Placement Considerations for Homes and Rentals
Wi‑Fi setup is only part of the job. Placement affects signal, privacy, viewing angle, and whether the device fits your home rules.
Wired vs. battery models, mounting height, and viewing angle
Battery models are often easier for renters, while wired models can avoid charging. The best mounting height depends on the model, but the goal is usually to see faces and packages without pointing too high or too low.
Angle matters too. A doorbell that points at the sky or the floor may miss visitors and create more false motion alerts.
Apartment, condo, and rental restrictions
Renters should check lease terms before drilling or changing wiring. Some buildings limit exterior changes, shared hallways, or devices that record common areas.
If you cannot drill, look for no-drill mounting options or ask the landlord for approval first. You may also need to avoid placing the camera where it records neighbors, mail areas, or shared walkways.
Weather exposure, porch layout, and neighbor privacy
Front porches vary a lot. Rain, direct sun, and wind can affect both mounting and signal quality.
Also think about what the camera sees. Privacy zones and careful angle choice can help reduce recording of sidewalks, windows, or a neighbor’s door.
Privacy, Cybersecurity, and Shared Access Settings
Once the doorbell is online, account security matters just as much as Wi‑Fi. A video doorbell can expose video, audio, and household activity if the account is weak or widely shared.
Two-factor authentication, strong passwords, and account recovery
Use a unique password for the Ring account and turn on two-factor authentication if available. That adds a second check when someone signs in.
Also confirm your recovery email and phone number are current. If you lose access later, account recovery can be much easier when those details are up to date.
Motion zones, privacy zones, and audio settings
Motion zones help narrow where the doorbell watches. Privacy zones can block parts of the image that should not be recorded.
Audio settings matter too. If your state or building rules require care with recording, review microphone settings and alerts before you leave the device active.
Shared users, app permissions, and household access
Households often need shared access for partners, caregivers, or family members. Give access only to people who need it, and remove users who no longer should see the camera.
Also review app permissions on each phone. A lost or replaced phone should not keep access forever.
Storage, Alerts, and Subscription Costs After Wi‑Fi Setup
Wi‑Fi gets the doorbell online, but storage and alerts determine how useful it is day to day. The right plan depends on whether you want live view only or recorded events you can review later.
Live view, event history, and cloud recording basics
Live view lets you check the door in real time. Event history helps you review motion or ring events after they happen.
Cloud recording usually depends on the plan and settings. If you want to compare storage approaches, our Ring battery doorbell subscription guide explains the usual plan questions in plain language.
What Ring subscriptions change for recording and review
Subscriptions can change whether you get event recording, how long clips stay available, and whether you can review past activity. The exact features vary by plan and may change over time.
Before you buy anything, confirm what is included for your exact model and region. That is the safest way to avoid surprises after setup.
Ownership cost: device, installation, internet, power, and ongoing fees
The full cost is more than the doorbell itself. You may also pay for mounting parts, a chime accessory, a stronger router, cloud storage, or professional installation.
Battery models can add charging time and replacement battery costs. Wired models may need an installer if the existing transformer or wiring is not compatible.
Local Storage
Explain hardware, capacity, access, backup, and theft risks.
Cloud Storage
Explain plan cost, retention, internet dependence, account access, and provider controls.
Maintenance, Limitations, and Next Steps
After setup, the best habit is simple maintenance. Check updates, power, and signal now and then so the doorbell stays reliable.
Firmware updates, battery charging, and periodic Wi‑Fi checks
Firmware updates can improve stability and security. Keep the app updated too, since app changes can affect login and notifications.
For battery models, charge before the battery gets too low. For all models, test the Wi‑Fi signal at the front door every so often, especially after router changes or home remodeling.
When to contact support or consider a network upgrade
Contact support if the device will not pair after basic checks, or if the app shows repeated errors. If the doorbell works only near the router, a mesh system or extender may be a better fix than repeated resets.
For exact power, wiring, and setup requirements, use the model manual and support pages. If you need a model-specific setup refresher, our Ring battery doorbell guide is a helpful place to compare the general steps.
Final Takeaway
Connecting a Ring video doorbell to Wi‑Fi is usually straightforward when the device has power, the app has permissions, and the router signal is strong. The main limits are model compatibility, network range, and privacy settings, so verify those before you mount the doorbell for good.
Many Ring models work best on 2.4 GHz, especially at the front door where range matters. Check your exact model manual, because support can vary.
The most common causes are low battery, missing power, or the wrong reset step for the model. Confirm the device is powered and follow the manual exactly.
Yes, but you may need to update the Wi‑Fi settings in the app or set up the device again. Smart devices often do not switch to a new password on their own.
Not always. Wi‑Fi setup gets the doorbell online, but recording and event history can depend on the plan and model.
Try a stronger router location, a mesh node, or an extender near the entry. Also check for walls, metal doors, and other blockers.
Review motion zones, privacy zones, audio settings, shared users, and two-factor authentication. Those controls help limit access and reduce unwanted recording.
Hi, I'm Marcus Sterling, a smart home security expert with over 5 years
of hands-on experience testing and reviewing hundreds of security cameras, smart locks, and alarm systems. My mission is to make smart home security accessible, affordable, and easy to understand—and every review I publish is 100% independent, unbiased, and honest. I don't accept payments for positive reviews, just practical advice to help you secure your home with confidence.
Video doorbells let us see visitors, speak with them, and monitor activity near the entrance without opening the door. Models with wireless cameras and app controls can also send alerts when they detect motion, while a local hub can store recordings and connect other security devices. The eufy Video Doorbell E340 + HomeBase 3 bundle…
Choosing between the eufy Video Doorbell E340 and S330 depends on how you plan to power, install, and use your doorbell. Both models offer dual-camera coverage, but their storage, hub requirements, and daily features differ. We recommend the E340 for most homes because it works as a standalone doorbell, supports local storage expansion, and offers…
Quick Security Answer Battery-only is usually the simplest choice, especially for renters or shaded entries. A solar charger is most useful when the porch gets regular sun and you want fewer manual charging cycles. The ring battery doorbell solar charger vs battery choice depends on upkeep, sunlight, and recording use. For many U.S. homes, battery-only…
Quick Security Answer Install a Blink video doorbell by checking power, Wi-Fi, and mounting location first, then pairing it in the app. The easiest setups are the ones that match your home wiring, signal strength, and privacy needs before you drill. Learning how to install a blink video doorbell starts with power, Wi-Fi, and placement….
Quick Security Answer SimpliSafe video doorbell installation is usually simple if your wiring, Wi-Fi, and mounting spot are ready first. Renters should check permission rules before drilling, and every user should review app security and recording settings after setup. Simplisafe video doorbell installation is usually simple for a homeowner with wired doorbell power. But the…
How to install ring wired doorbell 4k pro is a practical question for homeowners and renters who want a hardwired video doorbell that fits their entryway, Wi-Fi setup, and privacy needs. This guide walks through the installation process in plain English, with safety checks, compatibility notes, and the everyday setup steps that matter after the…