A wired video doorbell can be a practical upgrade if your transformer, chime, and Wi-Fi all match the model’s requirements. Renters and shared buildings should check rules first, because wiring access and mounting limits can change the best option.
Wiring video doorbell usually means connecting a new smart doorbell to the low-voltage circuit that already powers an old chime. If your home has the right transformer, wiring access, and Wi-Fi signal, the job is often straightforward. If not, the safest path may be a plug-in adapter, a no-chime setup, or a qualified electrician.
What “Wiring a Video Doorbell” Means and Whether Your Home Is Compatible
Wired video doorbells use the same basic power path as a traditional doorbell. They do not usually run on standard 120V household wiring at the button itself. Instead, they rely on low-voltage power from a transformer and a doorbell circuit.
Compatibility starts with three things: the transformer, the chime, and access to the existing wires. If any one of those is missing or unclear, the install can become more complex. That is why many homeowners check the manual before drilling or removing the old button.
How wired video doorbells get power from an existing doorbell circuit
A wired video doorbell draws power from the same circuit that once powered the old button. The transformer lowers household power to a safer low-voltage level. The doorbell button completes the circuit when pressed, which triggers the chime.
Some smart models need constant power for video, motion alerts, and Wi-Fi. That means the old doorbell wires must deliver enough current all the time, not just when someone presses the button.
Homeowner vs. renter constraints, HOA rules, and lease restrictions
Homeowners usually have the most flexibility, but they still need to follow local code and product instructions. Renters should check the lease before drilling, hardwiring, or changing shared entry hardware. HOA rules can also limit visible hardware, wire routing, and camera placement.
If you live in an apartment or condo, the wiring may belong to the building. In that case, ask management before touching the circuit. A no-drill mount or battery model may be a better fit.
Quick compatibility check: transformer voltage, chime type, and wiring access
Check the transformer label first. Many video doorbells need a specific voltage range and enough VA, which is the transformer’s power capacity. Then confirm whether your chime is mechanical or digital, since some devices work with one and not the other.
Finally, look for two low-voltage wires at the old button and enough space behind the mounting plate. If you cannot find them, the wiring may be hidden, damaged, or routed through a different box.
Answer First: The Basic Installation Path From Old Doorbell to Video Doorbell
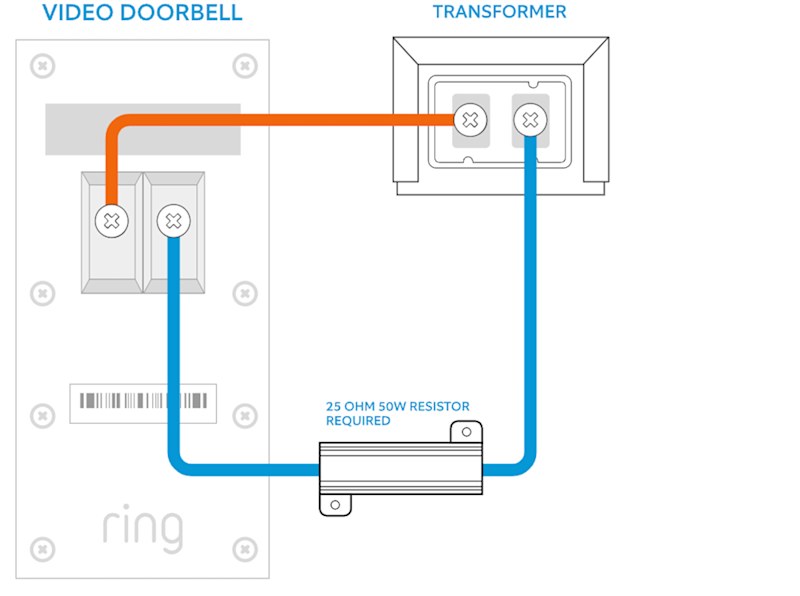
Basic wiring path from an existing doorbell to a video doorbell.
The basic path is simple: shut off power, remove the old button, connect the two low-voltage wires, mount the new doorbell, and finish setup in the app. The details matter, though, because a small wiring mistake can cause power loss, chime issues, or device resets.
Turn off power, remove the old button, and identify the two low-voltage wires
Start by turning off the breaker that feeds the doorbell transformer. Then test the circuit if you have the right tool. Do not rely on guesswork, especially if the wiring is old or unlabeled.
After removing the old button, you should usually see two low-voltage wires. Label them before disconnecting them. If the wires look frayed, corroded, or too short to reach the new bracket, stop and reassess.
Install the mounting bracket, connect the wires, and secure the device
Mount the bracket level and at the height the manual recommends. Most video doorbells work best when they face visitors directly, not at a steep angle. Connect the wires firmly, then tuck them so they do not pinch behind the unit.
Some installations need a power kit, bypass, or chime connector. These parts help the doorbell work with certain chimes or transformer setups. If your model includes one, install it exactly as directed.
Set up the app, verify live video, and confirm the chime or digital alert
Once the doorbell is mounted, restore power and complete app setup. Pair the device, connect it to Wi-Fi, and check for firmware updates. Then test the live view, motion alerts, and the doorbell press.
Confirm that the indoor chime rings or that the digital alert reaches your phone and speakers. If the app works but the chime does not, the issue is often wiring, compatibility, or a missing accessory.
1
Confirm requirements
Verify the exact model, power, network, storage, placement, household, rental, and platform requirements.
2
Plan safe placement
Consider privacy, field of view, weather, height, doors and windows, wiring, and emergency access.
3
Install and secure
Follow the exact manual, update firmware, use a unique password, and enable MFA.
4
Test and maintain
Test alerts, recording, outage behavior, batteries, users, permissions, and backup procedures.
Power, Transformers, and Chime Modules: What Has to Be Right
Power is the most common reason a wired video doorbell fails to behave well. The device may boot, but still reboot, miss chimes, or drop offline if the transformer is too weak. Matching the power requirements is a safety and reliability issue, not just a convenience issue.
Why transformer voltage and VA rating matter for stable operation
Voltage is the electrical pressure. VA, or volt-ampere rating, tells you how much power the transformer can supply. A doorbell can need both the right voltage and enough capacity to support video, motion sensing, and Wi-Fi.
If the transformer is undersized, the doorbell may not charge, may not ring the chime, or may disconnect during activity. Check the exact model manual and the transformer label before assuming it is compatible.
Mechanical chimes, digital chimes, and bypass kits explained
A mechanical chime uses moving parts and a physical striker. A digital chime plays a sound through electronics. Some video doorbells support both, while others need a special adapter or bypass kit.
A bypass kit can help when the doorbell needs constant power and the chime should be taken out of the loop. The exact wiring method depends on the model, so the manual is the best source.
When a plug-in adapter or no-chime setup makes more sense
A plug-in adapter can be better when the old transformer is hard to reach or not strong enough. It can also help in rentals where you cannot change the building wiring. In some homes, a no-chime setup is simpler if alerts go to phones, speakers, or smart displays.
That tradeoff can make sense for apartments, side doors, or detached garages. It can also reduce the chance of chime mismatch. For a deeper comparison of wiring styles, see wired vs. battery doorbell setups.
Placement, Field of View, and Weather Considerations<
Proper placement helps capture visitors while reducing weather-related exposure.
Placement affects what the camera sees, how well motion works, and how useful the doorbell is day to day. A doorbell can be wired correctly and still perform poorly if it faces too much glare, misses faces, or points at the wrong part of the porch.
Best mounting height and angle for faces, packages, and porch coverage
Most video doorbells work best when mounted at about chest height for an adult visitor. That usually helps capture faces and hands near the button. If the porch is deep, a wedge or angle mount may improve the view.
Packages are often placed lower than faces, so you may need to balance both. A slight downward angle can help, but too much angle can hide faces. Check the manual for the recommended height and use the included wedge if needed.
How porch depth, stairs, and side lighting affect motion detection
Deep porches can create blind spots. Stairs can also change the camera angle more than expected. Side lighting from windows or lamps may cause motion alerts to trigger at the wrong time.
Motion zones help focus alerts on the walkway or landing. If the doorbell sees a sidewalk, street, or neighbor’s entry, narrow the detection area when the app allows it.
Weather exposure, sun glare, night vision, and cold-weather performance
Outdoor placement means dealing with rain, heat, sun, and cold. Direct sun can wash out video. Rain can create glare or false motion. Cold weather can also affect batteries and startup behavior, even in wired models with backup cells.
Check the exact weather rating for the model you buy. Do not assume every doorbell has the same outdoor durability. If the unit sits in full sun or near an open porch edge, it may need a better mount or shroud.
Wi-Fi, App Setup, and Smart Home Integration
Even a perfectly wired doorbell still needs a stable network. Most setup problems after installation come from weak Wi-Fi, incorrect app settings, or account issues. That is why network checks matter as much as the wiring itself.
2.4 GHz vs. 5 GHz support, signal strength, and router placement
Many video doorbells support 2.4 GHz Wi-Fi, which usually reaches farther through walls. Some models also support 5 GHz, which can be faster but may not travel as well. The exact band support varies by model.
If the doorbell is far from the router, a mesh node or access point may help. Thick walls, metal doors, and exterior masonry can weaken the signal. A strong signal at the front door is often more important than raw internet speed.
Wi-Fi & Network Check
Explain supported bands, upload needs, router distance, mesh behavior, Ethernet or PoE, hub requirements, outage behavior, and network-isolation options where relevant.
Pairing, firmware updates, and account recovery basics
During pairing, the app usually asks for Wi-Fi details, location access, and notification permissions. After setup, check for firmware updates right away. Updates can fix bugs, improve stability, and patch security issues.
Also set up account recovery before you need it. Use a current email address and phone number. If the vendor offers backup codes, save them in a safe place.
Shared users, voice assistants, and integration limits to expect
Many households need more than one user. Shared access is useful for partners, caregivers, and older children. Still, every extra account should have only the access it needs.
Privacy, Cybersecurity, and Neighbor Considerations
Doorbells that record video can also record shared spaces. That makes privacy settings important, especially in apartments, townhomes, and close neighborhoods. Good setup can reduce tension and lower unnecessary exposure.
Using privacy zones, motion zones, and audio controls responsibly
Privacy zones can block parts of the image, such as a neighbor’s doorway or a public sidewalk. Motion zones can limit alerts to the porch or steps. Audio controls matter too, because some homes prefer to disable certain audio features.
Use these tools to focus on your own entry area. That keeps alerts more useful and reduces the chance of recording more than you need.
MFA, strong passwords, and secure account recovery practices
Use a unique password for the doorbell account. Turn on multi-factor authentication, or MFA, if the vendor supports it. MFA adds a second check when you sign in.
Review shared users, app permissions, and linked services after setup. If you change phones or email addresses, update recovery settings right away. That can prevent lockouts later.
How to reduce exposure of sidewalks, neighboring doors, and shared spaces
Point the camera toward your entry, not the whole block. Use the narrowest useful motion zone. If the doorbell captures a shared hallway or sidewalk, adjust the angle or use a different mount.
In shared buildings, let neighbors know when a camera points near common space. Clear communication can prevent misunderstandings.
Storage, Subscriptions, and Ongoing Ownership Costs
Ownership costs go beyond the doorbell itself. You may also pay for a plan, storage, accessories, replacement parts, or installation help. The right choice depends on whether you want simple alerts or longer clip history and advanced features.
What local storage, cloud clips, and event history typically include
Local storage keeps clips on a device at home, such as a hub, card, or base station. Cloud storage keeps clips on the vendor’s servers. Both can work well, but they solve different problems.
Local Storage
Explain hardware, capacity, access, backup, and theft risks.
Cloud Storage
Explain plan cost, retention, internet dependence, account access, and provider controls.
Subscription tiers, retention windows, and advanced alert features
Some brands offer basic live view without a plan, while others limit recording or clip history unless you subscribe. Features can include event history, person detection, package alerts, or richer activity logs. Exact tiers vary by model and region.
Before buying, check what works without a plan and what disappears if you cancel. That is especially important for households that want to compare options like the Ring Doorbell subscription guide.
Long-term cost comparison: hardware, power use, and recurring fees
A wired video doorbell may cost less to keep powered than a battery model, but that does not remove all ongoing costs. You may still pay for cloud storage, replacement accessories, or professional help if the wiring is not compatible.
Think of the total cost over several years, not just the shelf price. A lower-cost device with a required subscription can end up costing more than a pricier model with local storage.
Troubleshooting, Maintenance, and When to Call an Electrician
Most problems have a safe first step. Check the breaker, wiring screws, app settings, and Wi-Fi signal before replacing parts. If the issue involves damaged wire, heat, or an unknown transformer, stop and get help.
Common issues: no power, weak chime, offline device, and delayed alerts
No power often points to a breaker issue, a loose wire, or an incompatible transformer. A weak chime may mean the chime module is missing or the transformer is underpowered. An offline device usually points to Wi-Fi trouble or a router change.
Delayed alerts can come from weak signal, app permissions, or battery backup behavior. Rebooting the router and checking notification settings often helps. If not, review the vendor’s support steps in order.
Routine upkeep for lens cleaning, battery backup, and firmware updates
Clean the lens gently when dust or pollen builds up. Check the mounting screws after weather changes. If the model has a backup battery, confirm that it still charges and holds power as expected.
Firmware updates matter too. They can improve reliability and security. Set the app to notify you about updates if that option is available.
Safety limits, wiring red flags, and situations that need professional help
Stop if you see melted insulation, scorch marks, exposed mains wiring, or a transformer you cannot identify. Also stop if the circuit keeps tripping or if the old wiring is brittle. Those are signs to use the manual or call a qualified electrician.
If you are in a rental, shared building, or HOA community, get approval before changing anything visible or permanent. That is often the fastest way to avoid delays and repair costs.
Final Takeaway
Wired video doorbells work best when the transformer, chime, Wi-Fi, and placement all match the model’s manual. For homeowners, the job is often manageable; for renters and shared buildings, rules and wiring access matter just as much as the device itself.
Check the transformer label, chime type, and whether two low-voltage wires are available at the old button. If any of those are unclear, review the exact manual before you start.
Sometimes, but only if the lease and building rules allow it. Many renters need landlord approval or a no-drill alternative.
Yes. Wiring powers the device, but Wi-Fi is usually needed for live video, alerts, and app control.
The most common causes are a missing chime module, incompatible chime type, loose wiring, or a transformer that is too weak. Check the model manual and wiring connections first.
It depends on the brand and model. Some features may work without a plan, while cloud clips, retention, or advanced alerts may require one.
Call a qualified electrician if the wiring is damaged, the transformer is unknown, the circuit trips, or the installation instructions are unclear. Stop immediately if you see heat, scorch marks, or exposed mains wiring.
Hi, I'm Marcus Sterling, a smart home security expert with over 5 years
of hands-on experience testing and reviewing hundreds of security cameras, smart locks, and alarm systems. My mission is to make smart home security accessible, affordable, and easy to understand—and every review I publish is 100% independent, unbiased, and honest. I don't accept payments for positive reviews, just practical advice to help you secure your home with confidence.
Quick Security Answer The best outside camera depends on where you need coverage and how you plan to power it. For most homes, choose the model that fits your entry point, Wi-Fi, privacy needs, and storage preference. Which Camera Is Best for Outside depends on where you want coverage, how you power the camera, and…
Compare ring battery doorbell replacement battery for home coverage, privacy, power, storage, subscriptions, and value. Read the guide before choosing a system.
Quick Security Answer The Ring Battery Doorbell Plus is usually manageable for renters and homeowners if you check mounting rules, Wi-Fi strength, and app setup first. The biggest long-term factors are battery upkeep, privacy settings, and whether you need a paid cloud plan. ring battery doorbell plus install is usually a straightforward project for renters…
Choosing between the eufy Video Doorbell E340 and Ring depends on how you value video coverage, storage, and ongoing costs. The E340 uses dual cameras to show visitors and packages, while many Ring models focus on a single view and connect closely with Amazon’s smart home platform. We recommend the eufy E340 if you want…
Installing the eufy Video Doorbell E340 takes only a few basic steps, whether we use its rechargeable battery or existing doorbell wiring. We can mount it near the entryway, connect it to the eufy Security app, and adjust its settings for reliable alerts. We can install the E340 with battery power or 16–24 VAC wiring,…
Quick Security Answer Ring battery doorbells usually last from weeks to months per charge, depending on motion activity, settings, weather, and Wi-Fi. The best way to stretch runtime is to reduce unnecessary wakeups and keep the device well placed and well connected. how long do ring battery doorbells last depends on how often they wake…