Where to Place Water Leak Sensors for Best Protection
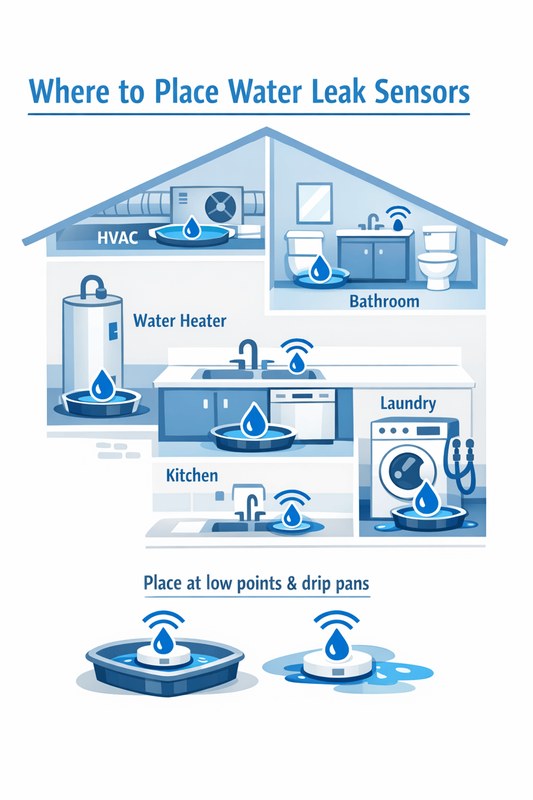
Place water leak sensors at the highest-risk spots: under sinks, behind toilets, near the washing machine, and around the water heater. Position them flat on the floor with clear access to water flow and test them monthly.
Knowing where to place water leak sensors is the difference between catching a small drip and discovering a flooded basement. This guide walks through the highest-risk spots in a typical U.S. home, explains how to position each sensor for reliable detection, and covers the practical details renters and homeowners need to know.
The Short Answer: Where Water Leak Sensors Matter Most
Water leak sensors detect moisture where it should not be. They sit on flat surfaces and sound an alert when water touches their contact points. The goal is to place them where water first appears during a leak, not where it pools after spreading.
Priority Locations Ranked by Risk
Some leak sources fail more often and cause more damage than others. Rank these locations first:
- Under sinks — Supply lines, drain traps, and shutoff valves fail without warning.
- Behind and beside toilets — Wax rings, supply hoses, and fill valves are common failure points.
- Near the washing machine — Supply hoses burst and drain hoses detach.
- Around the water heater — Tanks corrode and drip pans fill slowly.
- At the refrigerator — Ice maker lines and water filters leak at connection points.
- In basements and crawl spaces — Sump pumps, condensate lines, and foundation seepage appear here.
How Many Sensors the Average U.S. Home Actually Needs
Most homes need between four and six sensors to cover the highest-risk areas. A small apartment may need only two or three. A large house with multiple bathrooms and a finished basement may need eight or more.
Start with the kitchen, the main bathroom, the laundry room, and the water heater. Add sensors to secondary bathrooms and the basement after those are covered.
Room-by-Room Placement Guide
Kitchen: Under the Sink, Dishwasher, and Refrigerator Ice Maker Line
The kitchen is the most common source of household water damage. Place a sensor flat on the cabinet floor under the sink, directly below the drain trap and supply lines. If the cabinet has a false floor or a drawer blocking access, place the sensor on the lowest accessible surface.
Put a second sensor near the dishwasher. Slide it forward so it sits at the front edge of the appliance’s base, where water from a failed door seal or supply line first appears. For the refrigerator, place a sensor behind the unit near the ice maker connection point. If the fridge sits in a niche with no rear access, place the sensor at the side edge closest to the water line.
Bathrooms: Behind the Toilet, Under the Vanity, and Near the Tub
Toilets fail in two main ways: the wax ring under the base and the supply hose behind the unit. Place a sensor behind the toilet base, close to the shutoff valve and supply line. Position it so the contact points face the wall and the floor.
Under the vanity, place a sensor on the cabinet floor below the P-trap and supply lines. Keep it away from cleaning products that could trigger false alarms. Near the tub, place a sensor at the edge of the tub apron where overflow water first reaches the floor. This spot catches splashes and slow leaks from the drain assembly.
Laundry Room and Utility Closet: Washing Machine, Utility Sink, and Water Heater
Washing machine supply hoses are a leading cause of residential water damage. Place a sensor directly under the hose connections at the back of the machine. If the machine sits against a wall with no rear gap, place the sensor at the side where the hoses run.
For the utility sink, place a sensor on the floor below the drain and supply lines. For the water heater, place a sensor inside the drip pan if one exists. If there is no drip pan, place the sensor on the floor at the base of the tank, near the pressure relief valve and drain spigot.
Basement and Crawl Space: Sump Pump Pit, Drip Pan, and HVAC Condensate Line
The basement holds some of the highest-risk equipment in a home. Place a sensor at the edge of the sump pump pit, not inside the pit. The sensor should sit on the floor beside the pit cover or on the cover itself if it is flat and level.
For the HVAC unit, place a sensor under the condensate drain line where it exits the air handler. Many units have a secondary drain pan; place a sensor in that pan. In crawl spaces, place sensors at the lowest point of the floor near known moisture entry points. Keep them away from standing water and direct soil contact.
How to Position Each Sensor for Reliable Detection
Floor-Level Placement vs. Appliance-Level Placement
Most water leak sensors detect moisture through contact points on their base or sides. They work best when placed flat on a hard surface. Floor-level placement is the standard for under-sink and behind-toilet locations because water travels downward first.
Appliance-level placement works for specific cases. Some sensors can mount on the side of a washing machine or water heater with adhesive strips. This works when the sensor has side contact points and the appliance sits in a tight space. Check the product manual to confirm whether the sensor supports vertical mounting.
Avoiding Dead Zones and False Alarms
Dead zones are areas where water pools but the sensor cannot reach it. Avoid placing sensors behind large objects that block water flow. Keep sensors at least an inch away from walls and cabinet sides so water can reach the contact points.
False alarms happen when sensors get wet from routine cleaning, condensation, or steam. Keep sensors away from direct steam sources like kettles and shower openings. Wipe the contact points dry after cleaning the surrounding area. Some sensors have sensitivity settings; check the app or manual for adjustment options.
Renter-Friendly and Homeowner Installation Options
No-Drill, No-Wiring Options for Renters
Most water leak sensors require no drilling, wiring, or permanent changes. They sit on the floor or stick to surfaces with adhesive tape. This makes them ideal for renters who cannot modify a property. Place sensors on cabinet floors, behind toilets, and beside appliances without leaving marks.
Some sensors use a removable adhesive strip that peels off cleanly. Others use a small stand or holder that sits on the floor. Check the product manual for the exact mounting method before applying adhesive to a rental surface.
Hardwired and Hub-Based Options for Homeowners
Homeowners have more options. Hardwired sensors connect to a home security system or a dedicated hub. These sensors often have longer battery life and more reliable connectivity. Some systems offer expandable sensors that connect to a central panel with a wired or wireless link.
Hub-based sensors use a bridge or hub that connects to the router. The hub manages communication between sensors and the app. This setup works well for large homes where Wi-Fi signals are weak in basements or utility rooms.
Power, Connectivity, and Hub Requirements
Wi-Fi vs. Zigbee/Z-Wave vs. Proprietary Hubs
Water leak sensors connect in three main ways. Wi-Fi sensors connect directly to the router and work with most home networks. Zigbee and Z-Wave sensors use a hub that relays signals to the router. Proprietary hubs come with a specific brand’s sensors and may not work with other devices.
Wi-Fi sensors are the easiest to set up but can drain batteries faster. Zigbee and Z-Wave sensors use less power and can extend the range of a home network. Proprietary hubs offer tight integration but limit future device choices. Choose the option that fits your existing smart home setup.
Battery Life, 2.4 GHz vs. 5 GHz Bands, and Signal Strength
Most water leak sensors use coin-cell or AA batteries. Battery life ranges from one to three years depending on the sensor type and how often it checks for moisture. Check the product manual for the expected battery life and replacement schedule.
Most sensors support 2.4 GHz Wi-Fi, not 5 GHz. The 2.4 GHz band travels farther and passes through walls better than 5 GHz. If your router broadcasts both bands, make sure the sensor connects to the 2.4 GHz network. Weak signals cause missed alerts and delayed notifications.
Monitoring, Alerts, and Subscription Costs
Self-Monitoring vs. Professional Monitoring
- Alerts go to your phone or email.
- No monthly fee for basic alerts.
- You decide what to do when an alert arrives.
- A monitoring center may review eligible alarms.
- Dispatch availability depends on the plan and event.
- Fees, contracts, permits, and false-alarm rules may apply.
Self-monitoring works for most households. You get an alert on your phone and can act quickly. Professional monitoring adds a layer of response but costs more and may require a contract. Some security systems bundle water leak sensors with professional monitoring as an add-on.
What a Subscription Actually Covers (and What It Doesn’t)
A subscription may cover cloud storage for sensor history, extended alert features, and integration with other smart home devices. It does not cover the cost of repairing the leak or replacing damaged property. Read the plan details to understand what alerts, storage, and response features are included.
False Alarms, Permits, and Dispatch Limits on Monitored Systems
Some US jurisdictions require alarm permits and may charge fees for repeated false alarms. Professional monitoring centers may limit how many alerts they dispatch on. Check your local rules and the monitoring plan’s terms before relying on dispatch for water leak alerts.
Privacy and Cybersecurity Considerations
What Data the Sensor and App Collect
Water leak sensors collect sensor status, battery level, and connectivity data. The app may also collect your location, device information, and usage patterns. Review the privacy policy to understand what data the manufacturer collects and how it is used.
Securing Your Account: MFA, App Permissions, Shared Users, and Firmware Updates
Enable multi-factor authentication on your smart home account. Use a unique password that you do not reuse elsewhere. Review shared users and remove anyone who no longer needs access.
Update the sensor firmware and the app regularly. Manufacturers release patches that fix security flaws. Set the app to auto-update when possible. Check the manufacturer’s support page for known issues and security advisories.
Cloud Retention, Vendor Support Lifecycle, and Account Recovery
Cloud retention varies by manufacturer and plan. Some store sensor history for 30 days; others keep it indefinitely. Check the plan details to understand how long data is kept and how to delete it.
Vendor support lifecycles matter. A sensor that loses app support becomes a paperweight. Check the manufacturer’s support page for the expected product lifespan and whether the sensor works without the app. Set up account recovery options so you can regain access if you lose your password.
Maintenance, Testing, and Known Limitations
Battery Checks and Monthly Sensor Testing
Test each sensor monthly. Press the test button on the sensor or use the app to trigger a test alert. Replace batteries when the app reports low battery. Keep spare batteries on hand.
Clean the sensor contact points with a dry cloth during testing. Dust and grime can block moisture detection. Test the alert sound and the phone notification together to confirm both work.
What Water Leak Sensors Can’t Detect (and Why They Can’t Stop a Leak)
Water leak sensors detect moisture on their contact points. They cannot detect slow seepage inside walls, under floors, or behind appliances. They cannot detect humidity or condensation. They also cannot stop a leak; they only alert you to it.
For leaks inside walls or under floors, you need a different type of monitoring. For stopping the flow of water, you need a smart shutoff valve. Water leak sensors are one part of a complete water damage prevention plan, not the whole solution.
Beyond Sensors: Smart Shutoff Valves and Whole-Home Monitoring
Adding an Automatic Shutoff Valve at the Main Water Line
A smart shutoff valve attaches to the main water line and closes automatically when a leak is detected. Some models connect directly to water leak sensors. Others use flow monitoring to detect unusual water usage. These devices can prevent catastrophic damage but require professional installation in most cases.
Check your local plumbing codes before installing a shutoff valve. Some jurisdictions require a licensed plumber for this work. The valve also needs power and network connectivity, so plan the installation location carefully.
Whole-Home Flow Monitors and Smart Home Automation
Whole-home flow monitors attach to the main water line and track water usage in real time. They can detect running toilets, dripping faucets, and burst pipes by analyzing flow patterns. Some models work with smart home platforms like Alexa, Google Home, and Apple Home.
Flow monitors do not replace water leak sensors. They catch different types of leaks. Flow monitors catch continuous leaks and abnormal usage. Water leak sensors catch sudden puddles at specific locations. Use both for the best coverage.
Place water leak sensors at the highest-risk spots: under sinks, behind toilets, near the washing machine, and around the water heater. Position them flat on the floor with clear access to water flow. Test them monthly and keep batteries fresh. Add a smart shutoff valve for whole-home protection. Water leak sensors alert you to a problem; they cannot fix it. Act quickly when an alert arrives.
Frequently Asked Questions
Some water leak sensors work without Wi-Fi by using a local hub or a built-in siren. Others need Wi-Fi to send alerts to your phone. Check the product manual to confirm whether the sensor alerts locally or requires an internet connection.
Most U.S. homes need four to six sensors. Start with the kitchen sink, main bathroom toilet, washing machine, and water heater. Add more sensors for secondary bathrooms, the basement, and the refrigerator ice maker line.
No. Standard water leak sensors detect moisture on their contact points. They cannot detect leaks inside walls, under floors, or behind appliances. For those locations, you need a whole-home flow monitor or a professional leak detection service.
Most water leak sensors work without a subscription for basic alerts. Some brands offer optional plans for cloud storage, extended history, or professional monitoring. Check the product details to see what features are free and what requires a paid plan.
Test each sensor monthly. Press the test button or use the app to trigger a test alert. Replace batteries when the app reports low battery. Clean the contact points with a dry cloth during each test.
No. Water leak sensors only alert you to moisture. They cannot stop the flow of water. To stop a leak automatically, you need a smart shutoff valve that closes the main water line when a sensor detects moisture.