Install a Blink video doorbell by checking power, Wi-Fi, and mounting location first, then pairing it in the app. The easiest setups are the ones that match your home wiring, signal strength, and privacy needs before you drill.
Learning how to install a blink video doorbell starts with power, Wi-Fi, and placement. Plan those first, and the setup is usually simpler.
How to Install a Blink Video Doorbell: What to Do First
Start by checking the exact Blink model, your power source, and your home layout. Decide if you want a wired setup, a battery setup, or a no-drill mount for a rental. A few minutes of prep can prevent rewiring, weak Wi-Fi, or poor video angles later.
Check Compatibility Before You Drill
Check that the doorbell fits and wiring lines up before drilling.
Before mounting anything, make sure the doorbell fits your power, chime, and mounting setup. Blink doorbells can have different setup paths depending on the model and whether you use battery power or existing doorbell wiring. If the wiring is unclear, stop and check the manual or hire a qualified electrician.
Wired vs. battery-powered setup
A battery-powered setup is often simpler for renters and homes without usable doorbell wiring. A wired setup may support continuous power or chime integration. That depends on the exact model and your home’s transformer and chime. If you want a broader comparison of power styles, see our guide on wired vs. battery doorbell setups.
Doorbell chime, transformer, and mounting surface checks
Check whether your indoor chime is mechanical or digital. Also verify the transformer rating if the doorbell will use house wiring. Low-voltage doorbell systems can still be unsafe to guess at. The mounting surface matters too. Brick, siding, stucco, and wood each need different anchors or adhesives. If you need a general wiring reference, our doorbell wiring guide explains the kind of checks that matter before any low-voltage install.
Renter and homeowner considerations
Renters should check lease rules, landlord approval, and whether drilling is allowed. A no-drill mount or adhesive option can help protect the property. Homeowners usually have more flexibility, but HOA rules, exterior finish, and wiring condition can still affect the install.
Gather the Tools, App, and Account Access You’ll Need
Have the tools, app access, and account details ready before you begin. That keeps the install moving and reduces the chance of leaving the doorbell half-set while you search for a password or screwdriver. It also helps if another household member will share access later.
Required tools and hardware in the box
Most installs use a drill, screwdriver, level, pencil, mounting screws, wall anchors, and the included bracket or wedge, if supplied. Keep a stable ladder nearby if the mounting spot is above shoulder height. If the kit includes adhesive, read the surface limits carefully before using it outdoors.
Blink app setup, account creation, and MFA
Install the Blink app first and create or sign in to your account. Enable multi-factor authentication, also called MFA, if the app supports it. Use a unique password instead of reusing one from email or shopping accounts. For a related setup example, our Ring battery doorbell setup guide shows the kind of app steps many smart doorbells require.
Wi-Fi band, signal strength, and router placement
Check which Wi-Fi band your Blink model supports and how strong the signal is at the front door. A weak signal can cause slow live view, missed alerts, or pairing failures. If possible, place the router or mesh node closer to the entryway. You can also test the signal before mounting.
Choose the Best Mounting Location for Coverage and Privacy<
Choose a mounting location that balances clear coverage with neighbor privacy.
The best location sees visitors clearly without recording too much of the street or a neighbor’s property. Aim for a view that covers the approach to your door, not the whole block. Good placement improves motion alerts and reduces privacy concerns.
Height, angle, and field of view
Mount the doorbell at a height that captures faces, not just packages or hats. A slight downward angle can help if the porch is elevated or the door is set back. If the home has a deep entryway, a wedge kit may improve the view.
Night visibility, porch lighting, and motion zones
Night video works better when the porch has steady light and the camera is not pointed into glare. Avoid bright fixtures that wash out faces. If the app offers motion zones, use them to focus on the walkway, steps, and door area.
Neighbor privacy and avoiding unnecessary capture
Do not aim the camera at a neighbor’s doorway, window, or private yard if you can avoid it. In many neighborhoods, the simplest privacy fix is a small angle change. Also remember that audio can capture more than you expect, so place the device with care.
Install the Blink Video Doorbell Step by Step
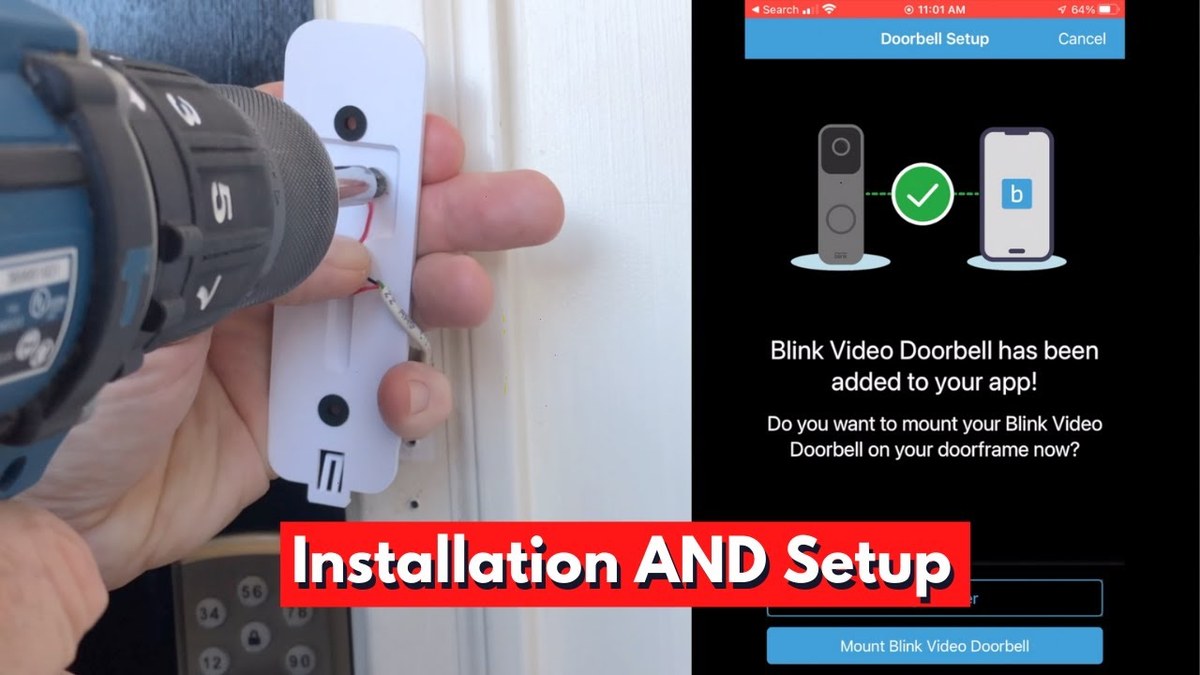
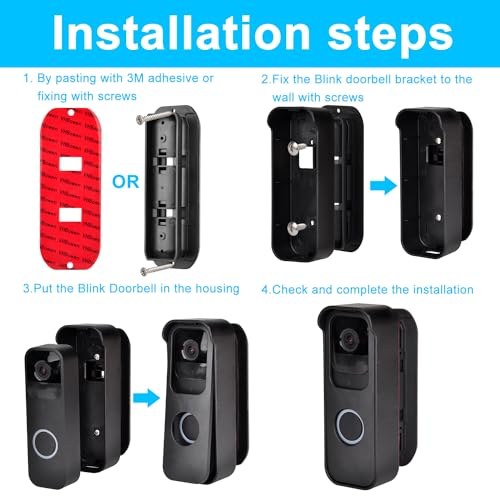
Once the location is set, the install is usually short. Mount the bracket, attach power or batteries, and finish setup in the app. Follow the exact model manual, because small differences can change the steps. If you want a no-drill comparison, our no-drill doorbell mount guide is useful for renters and temporary setups.
Mounting with adhesive or screws
Mark the bracket position, check it with a level, and confirm the camera angle before fastening it. Use screws and wall anchors when the surface allows it and the manual recommends them. Use adhesive only on surfaces the manufacturer approves. Press it firmly for the full recommended time.
Wiring the doorbell or inserting batteries
If your model uses existing wiring, turn off power at the breaker before touching any wires. Connect only the wires and terminals shown in the manual. If the model uses batteries, insert them in the correct direction and confirm the battery door closes fully. If the doorbell has a chime kit or power adapter, install that part exactly as directed.
Connecting the device in the Blink app
Open the app, add the device, and follow the pairing prompts. Keep the phone near the doorbell during setup. Make sure Bluetooth and Wi-Fi permissions are allowed if the app asks for them. After pairing, update firmware if prompted, then test the live view and motion alerts.
Set Up Alerts, Storage, and Monitoring Preferences
After installation, tune the settings so the doorbell works for your household. The default settings are rarely perfect for every porch, family schedule, or privacy need. A few adjustments can reduce false alerts and make the system easier to live with.
Motion sensitivity, activity zones, and notifications
Start with moderate motion sensitivity, then adjust after a day or two of normal use. Too much sensitivity can flood your phone with alerts. Too little can miss visitors. If the app offers activity zones, focus them on the steps, path, and doorway.
Cloud storage, local sync module options, and retention
Check whether your setup depends on cloud storage, local storage, or a sync module. Cloud storage usually adds account-based access and retention rules. Local storage can reduce subscription dependence, but it may require extra hardware and careful backup planning. For a related subscription example, see how Blink devices can work without a subscription.
Local Storage
Explain hardware, capacity, access, backup, and theft risks.
Cloud Storage
Explain plan cost, retention, internet dependence, account access, and provider controls.
Shared users, permissions, and account recovery
Decide who in the household needs access before you finish setup. Add only the users who need alerts or live view, and review permissions carefully. Save account recovery details, since losing access can make it hard to manage recordings or change settings later.
Troubleshoot Common Installation and Connection Problems
Most problems have simple causes, such as weak Wi-Fi, a low battery, or a missed setup step. Start with safe, reversible checks first. If the issue involves wiring, overheating, or a damaged mount, stop and review the manual.
Wi-Fi drops, pairing failures, and sync issues
If pairing fails, move the phone closer, restart the app, and confirm the correct Wi-Fi password. If the connection drops later, check router distance, mesh handoff, and nearby interference from walls or appliances. Rebooting the router can help, but only if the rest of the network is stable.
Chime not working, weak audio, or delayed alerts
When the chime does not sound, confirm the chime settings in the app and check any required power kit or adapter. Weak audio can come from poor signal, a loud porch, or incorrect volume settings. Delayed alerts often point to network congestion, battery saver settings, or a weak upload connection.
Weather exposure, battery drain, and mounting stability
Outdoor exposure can loosen adhesive, collect debris, or drain batteries faster in cold weather. Check the mount after storms and seasonal temperature swings. If the device shifts, the video angle and motion detection can change too.
Understand Subscription, Privacy, and Cybersecurity Tradeoffs
Before you rely on the doorbell every day, understand what works with and without a plan. Also review how recordings are stored, who can see them, and how the account is protected. Smart security is only as strong as the settings around it.
What features work without a plan
Some doorbell features may work without a paid plan, while others may require cloud storage or advanced alerts. The exact mix depends on the model and current plan terms. If you are comparing ongoing costs, look beyond the device price and include storage, accessories, and replacement parts.
Without a Plan$0
Add verified included features
Add verified limitations
Monthly PlanAdd verified price
Add verified cloud and alert features
Add retention and device limits
Annual PlanAdd verified price
Add verified savings
Add cancellation terms
Data security, firmware updates, and password hygiene
Keep the app, doorbell firmware, and router software updated. Use a unique password and MFA. Review shared users and connected services from time to time. These simple steps reduce the chance of account misuse and help keep recordings under your control.
Privacy settings, video retention, and legal considerations
Check whether the app lets you manage recording length, motion zones, and notification behavior. If recordings are stored in the cloud, learn how long they stay there and how to delete them. Laws on recording video and audio vary by state and situation, so verify local rules when the camera faces shared or public areas.
Maintain the Doorbell and Know When to Revisit the Setup
A good install still needs light maintenance. Clean the lens, check the mount, and review the app settings after weather changes or home network changes. Small updates can prevent bigger problems later.
Cleaning, battery checks, and seasonal inspections
Wipe the lens with a soft cloth and remove dust, spider webs, or pollen. Check battery status on a regular schedule if your model uses batteries. After heavy rain, snow, or heat, confirm that the doorbell is still level and secure.
When to adjust placement, settings, or Wi-Fi equipment
Revisit placement if you start missing visitors or catching too much street traffic. Adjust motion zones if you get too many false alerts. If video quality drops, the fix may be a stronger mesh node or a better router location rather than a new doorbell.
Ownership-cost and long-term support considerations
Look at the full cost of ownership, not just the first purchase. That includes batteries, accessories, subscriptions, and possible replacement hardware. Also check how long the manufacturer supports the model, since app support and firmware updates matter for long-term use.
Final Takeaway
The safest way to install a Blink video doorbell is to verify power, Wi-Fi, and mounting needs before you drill. That approach works best for homeowners and renters who want a clean setup, fewer alerts, and better privacy control.
It depends on the exact model and the setup you choose. Some installs use batteries, while wired setups depend on your home’s transformer, chime, and manual.
Often, yes, if your lease allows it and you use an approved method. Check landlord rules first, and consider a no-drill mount if drilling is not allowed.
You need a strong enough home Wi-Fi signal at the front door. Check the model’s supported band and test signal strength before mounting.
Some features may work without a plan, but storage and advanced features can vary by model and current plan terms. Review the latest plan details before you buy or install.
Use motion zones, limit shared users, and review what the camera can see from the street or a neighbor’s property. Also use a unique password and MFA on the account.
Start with Wi-Fi signal, router placement, battery level, and app permissions. If the issue continues, review firmware updates and the exact model manual.
Hi, I'm Marcus Sterling, a smart home security expert with over 5 years
of hands-on experience testing and reviewing hundreds of security cameras, smart locks, and alarm systems. My mission is to make smart home security accessible, affordable, and easy to understand—and every review I publish is 100% independent, unbiased, and honest. I don't accept payments for positive reviews, just practical advice to help you secure your home with confidence.
Quick Security Answer A Ring battery doorbell usually takes several hours to charge, but the exact time depends on the model, battery level, charger, and temperature. If charging seems slow, check the cable, power source, Wi-Fi, and battery age before assuming the device is faulty. how long does ring battery doorbell take to charge is…
The eufy Video Doorbell E340 works with HomeBase 3, also called the S380 HomeBase. This setup lets us connect the doorbell to eufy’s local storage system and manage compatible security devices in one place. Yes, the E340 is compatible with HomeBase 3/S380, but we need compatible firmware and proper setup for a reliable connection. We’ll…
Compare battery operated video doorbells for home coverage, privacy, power, storage, subscriptions, and value. Read the guide before choosing a system.
Compare 2k video doorbell for security, privacy, compatibility, setup, subscriptions, and value. Read the guide to choose the right option for your home.
The eufy Video Doorbell E340 can show connection, video, audio, motion, or chime problems. We can often fix these issues with basic checks before changing settings or resetting the device. We can troubleshoot the E340 by checking power, Wi-Fi, app settings, firmware, and connected devices in a clear order. This guide covers common faults, safe…